
From Idea to $$: Your 6-step Product Development Guide
Product development is the process of creating a new product, improving an existing product, or repositioning a product in the market. It progresses through a sequence that helps ensure a product meets the needs of target users and can be produced efficiently and effectively.
Projects that don’t follow a clearly defined process often end up over budget, out of time and failing to gain market traction. That’s why so many great product ideas never make it to market. To develop a successful product, you need to follow a proven product development process.

The 6 Stages: your roadmap to Product Development success.
Developing a product using a structured approach can help you reduce the risk of errors, omissions, and unexpected challenges that may arise during the development process. It also helps to clearly define the roles and responsibilities of your product team members and provides a framework for tracking progress and making necessary adjustments as the product is being developed.
“By failing to plan, you are preparing to fail” Benjamin Franklin
Projects that don’t follow a clearly defined process often end up over budget, out of time and unsuccessful. That’s why so many great product ideas never make it to market. To develop a successful product, you need to follow a proven product development process.
Stage 1: Research and Investigation
Building the Business Case
Simply put, your business case is a document that outlines the value of your product and explains why it’s worth pursuing. It includes a unique value proposition (UVP); which is a statement that clearly and concisely explains the value that the product will provide to your users, and how it meets their needs or solves their problems. The business case also includes an executive summary, which provides an overview of the product team, business strategy, and product strategy.

Building a business case is about more than justifying the resources you’re putting into your product. It’s also about making informed decisions, communicating your product’s value to stakeholders, and managing risks. To do this, it’s essential to involve the development team and conduct concept testing to ensure that the initial concept of the product is aligned with the company’s strategic goals and reflects the needs and preferences of the target market.
Here’s the workflow we follow when going through this process:
Generating the Idea
Coming up with a new idea is essential for success because if you’re not innovating, your competition will probably leave you in the dust!
Ideation is all about surfacing those “aha!” moments, whether it’s through internal brainstorming sessions or gathering feedback from external sources like online forums and niche communities. The idea generation process should involve teamwork, research, and technical feedback — and all of these elements should be considered before moving on to the next phase of product development.
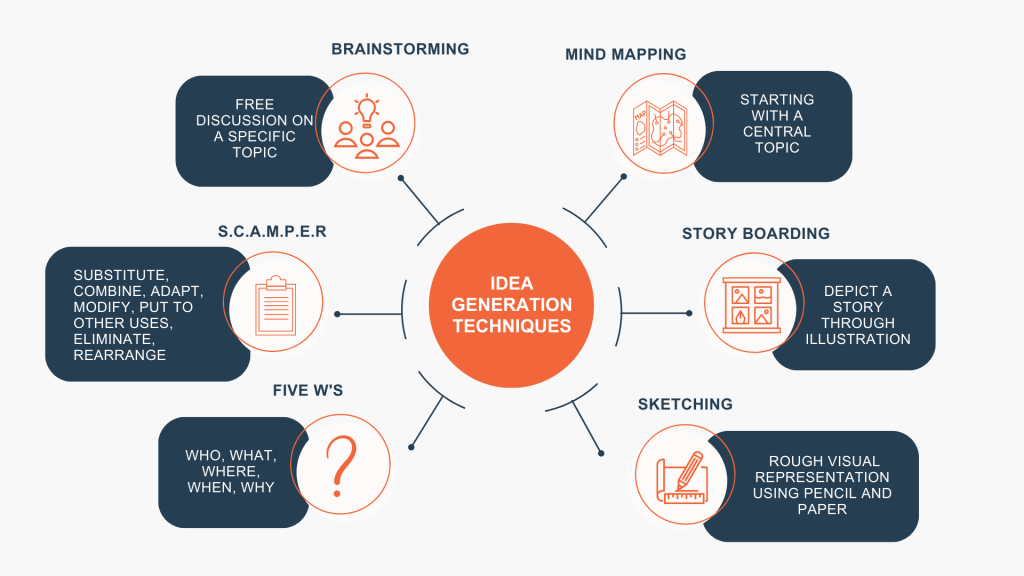
In reality, not all product discovery sessions result in “eureka” moments! That’s where idea screening comes in. This process helps to identify the most promising new product ideas and weed out the ones that aren’t quite ready for prime time. But just because your initial idea doesn’t make the cut during the screening process, doesn’t mean it’s a total loss. It could likely be saved for a later product development cycle, or used to inspire a new, even better idea. Or, cutting it early means you have just avoided huge opportunity costs in pursuing a junk idea.
Idea screening may not be the most exciting part, but it’s definitely a crucial step in bringing those game-changing new products to market. Plus, making the right choices at an early stage saves a lot of time and resources in the long run.
For a more in-depth guide on ideation, read Ideas, Passion and Market Fit.
Product Research and Evidence Generation
Product research is the process of gathering information and data about a specific product or new product idea, including identifying potential challenges or opportunities that may arise during the development process and understanding the features and benefits of the product.
| 💡 | Pro-tip: Understanding the product life cycle is a key aspect of product research that can help inform decisions about the development, marketing, and retirement of the product. |

Researching a product also involves gathering data or other forms of evidence to support the development and marketing of the product. In a non-medical context, this may include things like user testing, or customer feedback and in a medical sense this may involve clinical trials, case reports and real-world evidence reviews. The goal of evidence generation is to provide a solid foundation of information that can be used to inform decision-making and help ensure the success of a product.
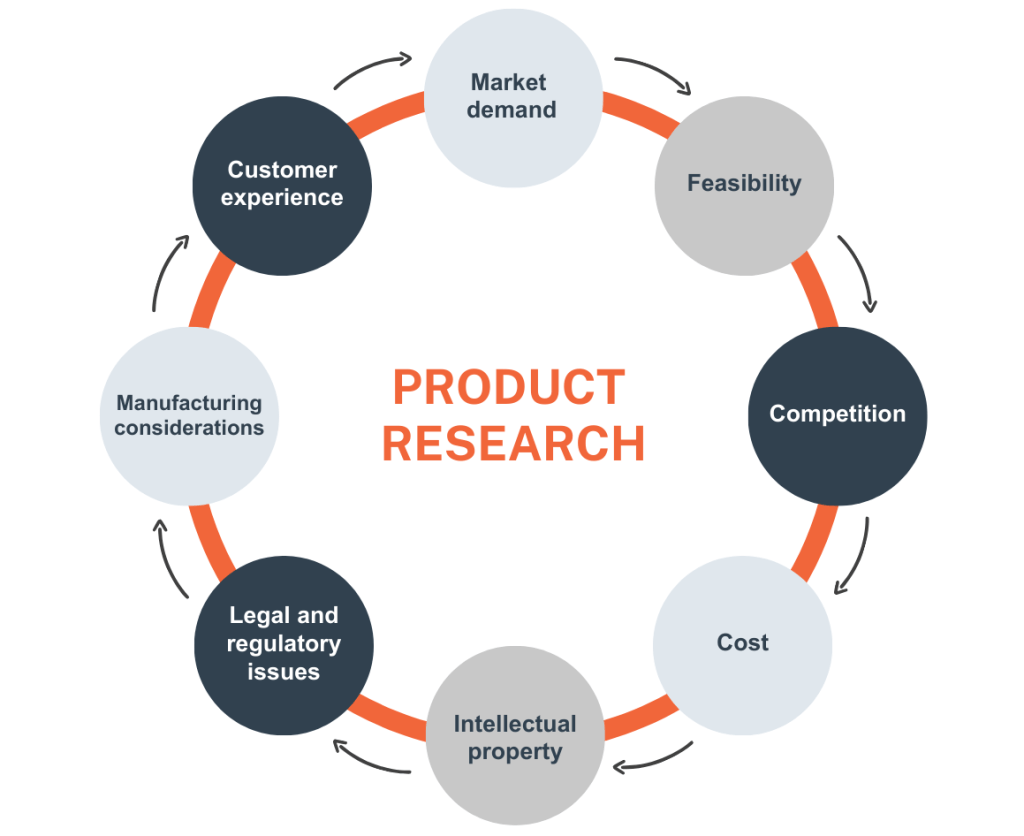
What are important things to consider when conducting product research?
-
- Market demand: Determine whether there is a market demand for the product and whether the product addresses a genuine need or problem.
-
- Feasibility: Assess whether the product is feasible to develop and manufacture, taking into account factors such as available technology, materials, and resources. Conducting a PESTLE analysis is also crucial.
-
- Competition: Research the competitive landscape to understand what similar products are available and consider how your product will be different and better.
-
- Cost: Estimate the costs associated with developing and bringing the product to market and consider whether the potential return on investment is sufficient.
-
- Intellectual Property (IP): Consider any intellectual property considerations, such as patents or trademarks, and ensure that your product does not infringe on the rights of others.
-
- Legal and regulatory issues: Research any legal or regulatory issues that may impact the development or sale of the product, and ensure that the product complies with relevant laws and regulations.
-
- Manufacturing considerations: Evaluate how the product will be manufactured, including the materials, processes, and equipment that will be needed, and ensure that these are feasible and cost-effective.
-
- Customer experience (CX): Think about the customer experience with the product, including how it will be used and what benefits it will provide, and ensure that it meets the needs and expectations of potential customers.
What information do I need for product research?
-
- What is the problem or need that the new product aims to solve?
-
- What are the unique features or benefits of the product, and how do they meet the needs of the target market?
-
- What are the potential challenges or obstacles that may arise during the development process?
-
- What resources (financial, human, technological) will be required to bring the product to market?
-
- How will the product be tested and validated before launch?
-
- What is the timeline for bringing the product to market, and what milestones need to be achieved along the way?
Both product research and evidence generation are critical components of the product development process. Thorough product research and the generation of strong supporting evidence can increase the likelihood of creating a successful product that meets the needs of your target market!
Conducting Market Research
Incorporating market research into the product development process is crucial for success. It helps provide a clear understanding of the target audience and their needs, informing product design and positioning decisions.

Without market research, the development process can be like throwing ingredients into a pot at random without knowing if the end result will be worth the effort. Market research is a valuable tool for predicting the potential success of a product, maximising the chances of it succeeding in the market.
But it’s not just about understanding your audience’s wants and needs. Market research also helps you get to know your competition. And the best part?…market research doesn’t have to be a headache. There are tons of tools and resources available to help you get the insights you need, from online surveys to focus groups to good ol’ fashioned customer interviews.
Here are three main areas you should cover in your market research:
#1 Develop a Buyer Persona
Personas are archetypal characters that represent the different types of users who might use your product. They are created based on market research and are used to help design and develop products that meet customer needs.
So how exactly does persona help with market research in the product development process? First and foremost, personas help you get inside the heads of your target users. By understanding the motivations, goals, and pain points of different personas, your team can design products that address the needs and desires of your target audience.
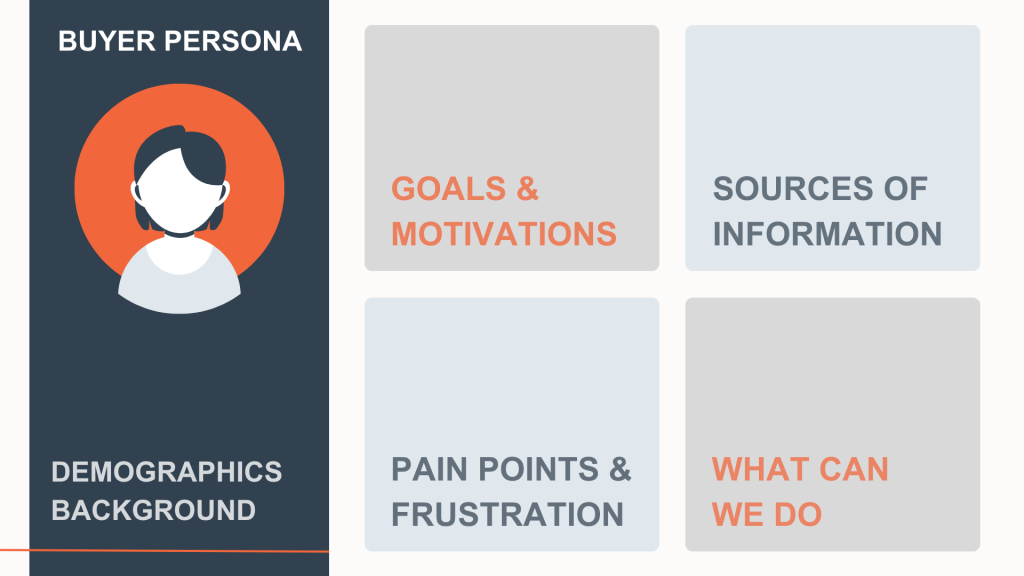
Fill out these elements of the Buyer Persona to ensure you build a comprehensive demographics background.
Personas also help your team focus on market research efforts. Instead of trying to gather information about a broad and diverse group of users, your team can focus on the specific needs and behaviours of the personas you have created. This allows you to gather more targeted and relevant data, which can inform the design and development of the product.
Finally, personas can help you test and validate your product concepts. By creating a prototype or MVP (Minimum Viable Product) and using them to gather feedback from users who match the Ideal Customer Profile, you can get a sense of how well the product concepts resonate with your target audience. This can help you fine-tune your product ideas and ensure that you are developing products that are solid-market fit!
#2 Map Out Customer Journey
Customer Journey mapping can be a powerful way to identify key touchpoints and determine how to make your product more user-friendly.
Journey mapping is a process that requires the participation of your stakeholders. For large companies, these may include your marketing team, sales team, product team, and more. The goal of the mapping is to determine how your customers or personas use your products and find out the best places to put those features to good use.
Customer journey mapping involves combining qualitative and quantitative research to create a detailed map of your user’s interactions with your products and services. This method also helps fill in the gaps in your internal processes. Mapping out the customer journey can be conducted by conducting surveys, interviewing prospective users, or listening to online discussions about products similar to yours.
| 💡 | Pro-tip: A customer journey map can help you understand how your product fits into the user’s overall experience and how it can solve their problem or fulfil their need, allowing for effective product positioning. |

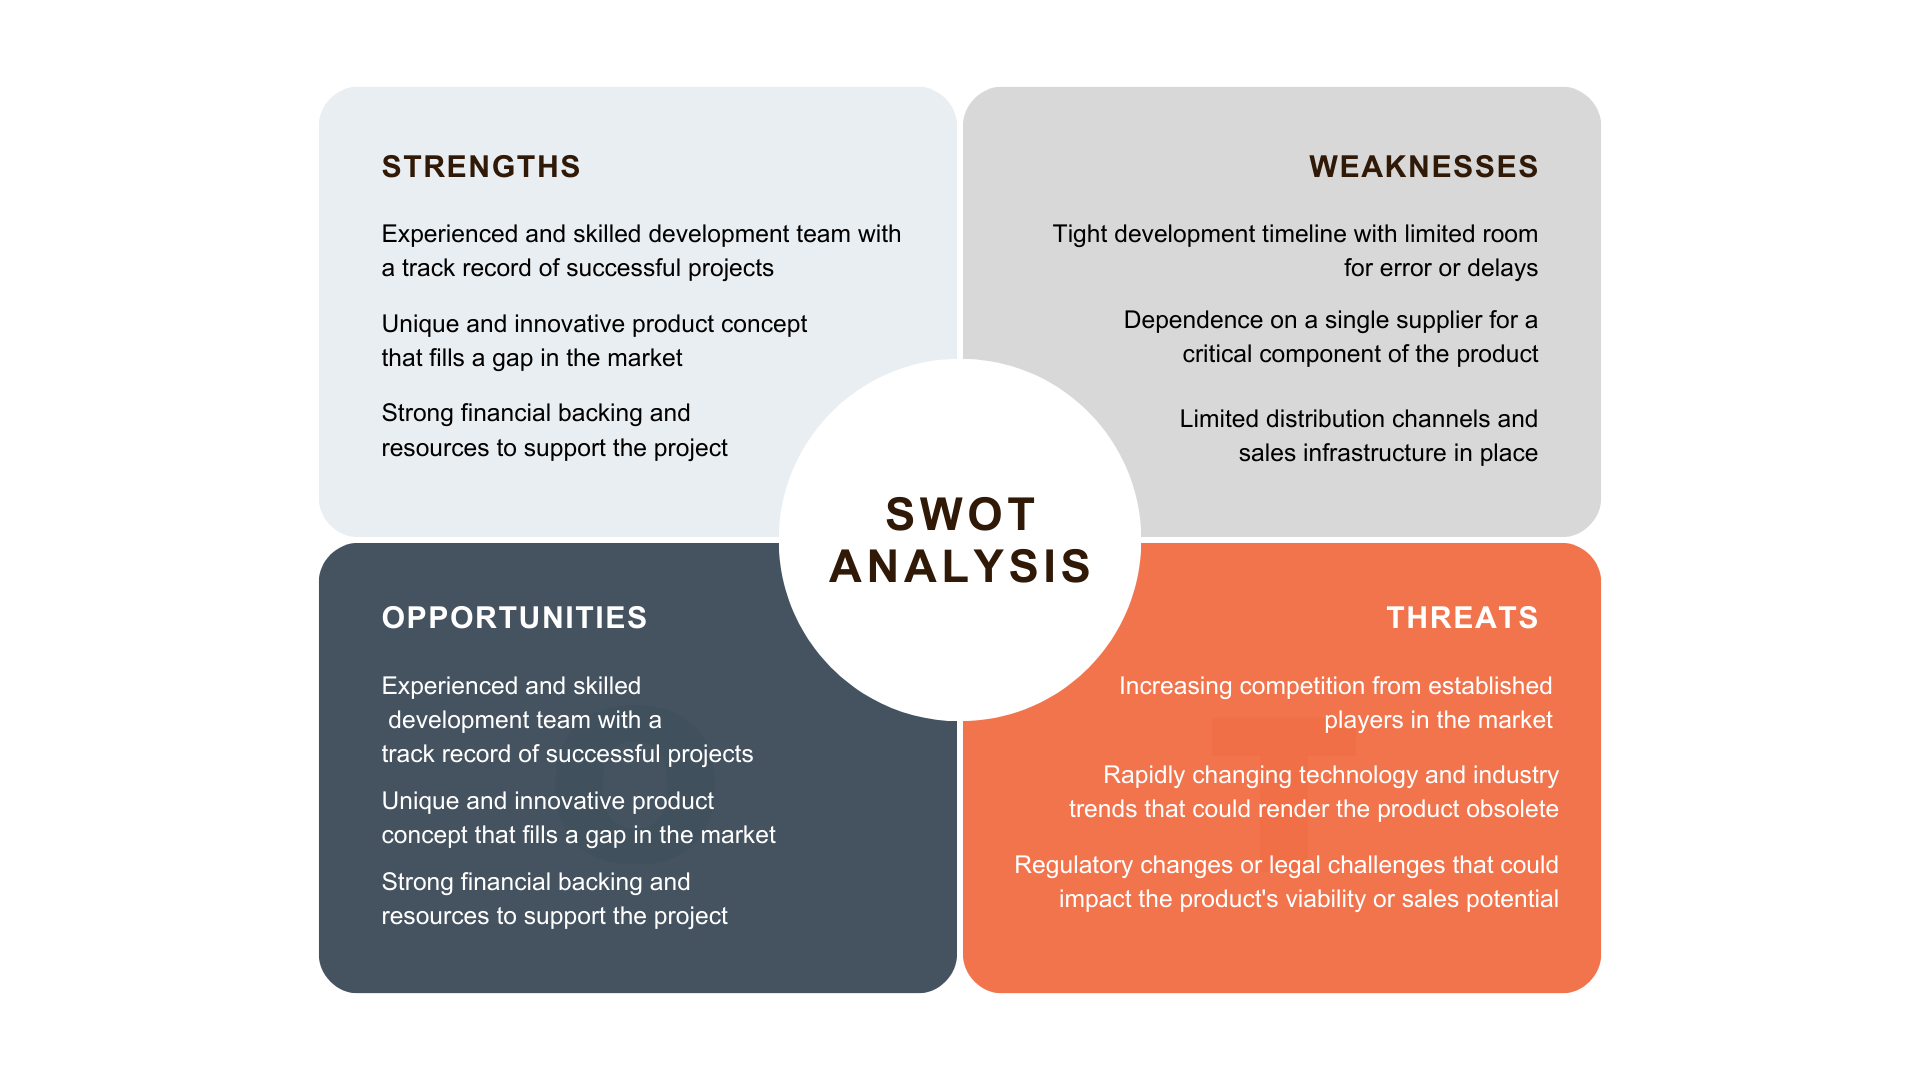
#3 Competitive Analysis
Analysing the competition can help you determine if your business has the resources to dominate your target market. There are several steps involved in conducting a competitor analysis. The first step is to identify your competitors. This may include direct competitors, who offer similar products or services, as well as indirect competitors, who offer products or services that meet the same need but in a different way.
The competitive business analysis also involves analysing marketing strategy and market share. The information collected from the following can help you identify the strengths and weaknesses of each and be used to make tactical changes, enhance marketing strategy, and ensure your product meets industry standards.
SWOT Analysis
An initial competitor analysis can take a couple of hours. However, a more in-depth study can take weeks to months. A competitor analysis template can help keep the data organised and the findings in one place. One of the best ways to understand your competition is to do a SWOT analysis. This is an analysis of each competitor’s strengths, weaknesses, opportunities, and threats.
Another useful tool is a Usage and Attitudes study. These studies can reveal customer attitudes and buying habits. Knowing how your customers feel about your products will allow you to add features to your offerings that are tailored to their needs.
What information should I have at the end of my market research?
-
- Who is the target market for my product, and what are their needs and preferences?
-
- What problems or challenges are my customers facing, and how can my product help to solve them?
-
- What is the value proposition of the product?
-
- What are the key drivers of consumer behaviour in my market?
-
- How will my product generate revenue?
-
- What are the costs associated with developing and marketing my product?
-
- Who are my competitors and how are they positioning themselves in the market?
-
- How does my product differ from similar products already in the market?
-
- What product innovations and trends in my market, and how might they impact my product or business?
-
- What is my pricing strategy for this product, and how does it compare to similar products in the market?
-
- What is the potential market size for my product?
-
- What is the expected return on investment for my product?
-
- What is the plan for marketing and distributing my product to the target market?
Defining Business Goals and Strategy
Setting business goals is vital when it comes to product development because it helps you focus on what you want to achieve with your product. It gives you a clear direction to follow and helps you to make decisions about how to allocate resources and prioritise tasks.
Having a business goal also gives you something to measure your progress against, which can help you track your progress and make adjustments as needed. It also helps to keep you motivated and focused on the big picture, rather than getting caught up in the day-to-day details of product development.
What are examples of product vision?
-
- Improving customer satisfaction: developing a new product feature that addresses a common customer pain point, or redesigning an existing product to be more user-friendly.
-
- Reducing costs: finding more cost-effective materials or suppliers, or automating certain tasks to reduce labour costs.
-
- Entering a new market: creating a new product specifically for a new target market, or adapting an existing product to meet the needs of a new market.
-
- Refining efficiency: streamlining the product development process, implementing new technologies or tools, or reorganising the team structure to increase productivity.
-
- Elevating sustainability: producing a new product that has a smaller environmental impact, or finding ways to reduce waste or energy consumption in the production process.
-
- Expanding internationally: adapting products for different cultural or regulatory environments, or establishing partnerships or distribution networks in new markets.
-
- Enhancing user experience: conducting user research to identify areas for improvement in a product, and then working to implement those improvements.
| 💡 | Establishing Specific, Measurable, Attainable, Relevant, and Time-bound (SMART) goals will help guide your product development efforts and ensure that you are working towards a defined end result. |
Risk Analysis
Another essential part of your product development strategy is risk analysis, it is typically conducted at various stages throughout the product development process. By identifying and assessing the risks early in the development process, your team can develop strategies to mitigate or eliminate the risks and incorporate those strategies into the overall project plan. Doing this helps ensure that the project stays on track and within budget, and allows the team to allocate resources effectively.
It would be best to conduct a team workshop to discuss your objectives and strategy, ensuring that all team members are working towards a shared objective. Read more about the importance of developing a product development strategy and how to develop a foolproof plan that will gear you up for success!
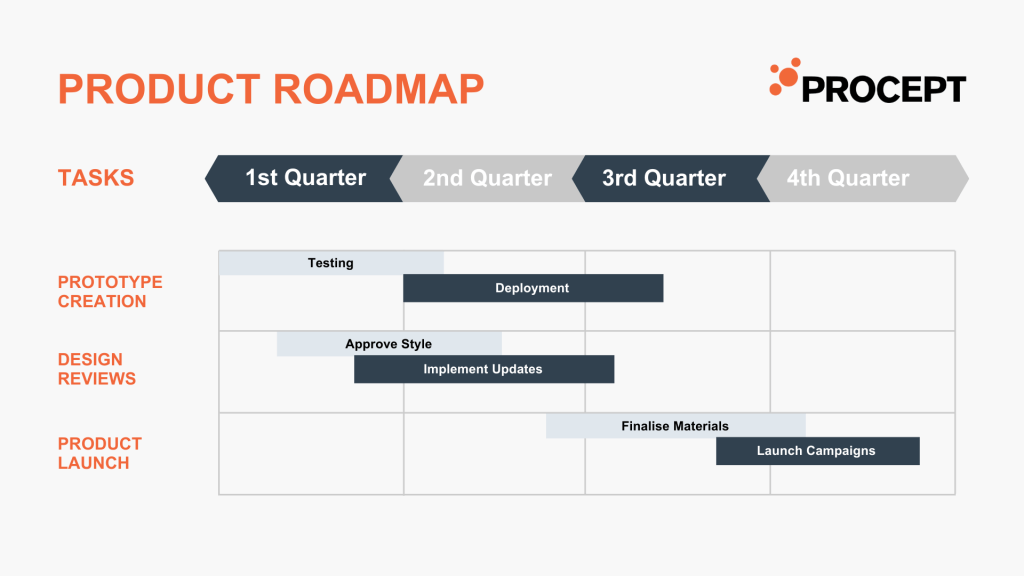
Creating Project Timeline and Costs
So you’re done with setting your project goals? Now it’s time for product planning, specifically estimating the project timeline and costs. This step guarantees that the project stays on track and within budget. At this stage, your product manager should take into account the key points below to help build your product roadmap.
How to create a project timeline and estimate cost?
-
- Break the project down into smaller tasks: Assign rough estimates of the time and resources required for each task.
- Consider dependencies and constraints: Dedicate a timeline to each task based on any factors that may impact the timeline.
- Estimate the cost of each task: Take into account the time required, resources needed, and any other expenses that may be incurred.
- Calculate the overall cost of the project: Add up the cost of all tasks, and add a contingency for unexpected challenges or changes.
- Review and revise the timeline and budget: Continuously review and update the estimates as needed based on new information or changes to the project.
Keep in mind that there is a high possibility you may encounter roadblocks during the development process — so here are a few things you should expect and look out for when creating a timeline and helping your product management.
-
- Delays: The product development process can take longer than expected due to a variety of factors, such as unforeseen issues with the design or manufacturing, delays in obtaining materials or components, or changes in the market.
-
- Budget overruns: The cost of developing a product can often exceed the original budget, due to unexpected expenses or changes in the scope of the project.
-
- Changes in market conditions: Changes in customer preferences or competition in the market can impact the demand for a product, which may affect the timeline and cost of development.
-
- Quality issues: Ensuring that the product meets the required quality standards can be a challenge, and addressing any issues that arise can add time and cost to the project.
-
- Limited resources: Product development can require significant resources, including time, money, and personnel. Limited resources may impact the timeline and cost of the project.
A project management approach you can use is the Agile methodology, which is particularly well-suited for product development projects that involve complex, rapidly evolving requirements or technologies, require frequent collaboration, have a high degree of uncertainty, require rapid iteration, or have tight deadlines.
Agile methodology is designed to emphasise flexibility, collaboration, and the ability to quickly adapt to change, and can be particularly effective for product development projects that require fast turnaround and the ability to deliver working products or prototypes quickly.
Stage 2: Proof of Concept
After you’ve done your research, it’s time to secure funding and start developing your concept into a prototype. This is a small-scale version of your final product that allows you to test out how your product works in real-life situations. The goal here is to not only see if people will use your product, but also learn how it works so that when the time comes for manufacturing you’ll be able to make necessary adjustments before moving on with production.
This stage focuses on product validation. It is also beneficial to conduct some test marketing to get some feedback from potential users to identify any issues or areas for improvement before you fully commit to the development process.
| 💡 | Pro-tip: Test marketing is a marketing strategy that involves introducing a new product or service to a small, targeted group of users in order to gauge their response and gather feedback. |
Prototyping is typically led by product managers, or UX designers, who work with a development team to bring the prototype to life and gather all that valuable feedback. But before you can dive into it, there are a few things you’ll need to tackle first.
Financing your Product Development Project
For all Product Development projects, from our many Established and Enterprise clients to the numerous Scale-up and Start-up businesses we have supported, there are various budget and project funding considerations, options and Advisory support services available.
No matter the size of your business or project, you may be eligible to apply for a grant, crowdfunding options are available, seeking out investors may be a viable option, there are accelerator programs you can participate in, or bootstrapping may be your preferred path to success.
Read our “5 Ways to Secure Product Fund” value guide here.
Design Controls
Once your team is in place, it’s time to start thinking about design controls. Design controls are a set of practices and procedures that are implemented during the product development process to ensure that the product meets the intended design specifications and requirements.
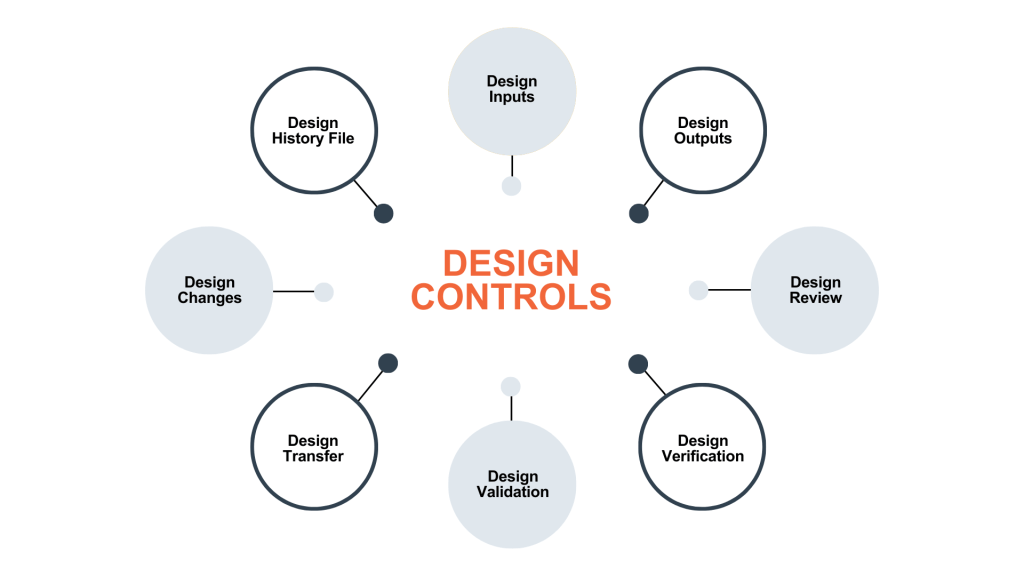
They are an important part of the product development process, as they help to ensure the quality, safety and effectiveness of the product.
What are the key elements included under design controls?
-
- Design inputs: The specific requirements, specifications, and other factors that influence the design of the product. Design inputs should be clearly defined and documented to ensure that the product meets the intended requirements.
-
- Design outputs: The final design of the product, including drawings, models, and other documentation. Design outputs should be reviewed and validated to ensure that they meet the intended design specifications and requirements.
-
- Design review: This is a process that involves reviewing the design of the product to identify any potential issues or problems, and to ensure that the product meets the intended design specifications and requirements. Design reviews can be conducted at various stages of the product development process, and should involve input from key stakeholders.
-
- Design verification: The process of verifying that the product meets the intended design specifications and requirements. This can be done through a variety of methods, such as testing, inspection, or analysis.
-
- Design validation: The process of verifying that the product meets the intended design specifications and requirements under actual or simulated use conditions. This helps to ensure that the product is safe, effective, and suitable for its intended use.
-
- Design transfer: The process of transferring the design of a product from development to production. It involves ensuring that all design requirements and specifications are properly documented and that the necessary manufacturing processes are in place.
-
- Design changes: It is common for changes to be made to a product design during the development process. These changes should be carefully documented and evaluated to ensure that they do not negatively impact the performance or safety of the product.
-
- Design History File (DHF): A DHF is a comprehensive record of all the design and development activities that have taken place for a product. It includes documentation such as design specifications, test results, and risk assessments. The DHF is an important resource for verifying that the design of a product meets all necessary requirements.
To effectively document an overview of your design controls, you can use a design control matrix. A design control matrix is a tool used in the product development process to help ensure that the design of a product meets all relevant requirements and standards.
It is usually organised by design control categories, such as functional requirements, performance requirements, safety requirements, etc. Each category may contain multiple design controls, each of which has a corresponding requirement or standard that must be met.
Controlling and standardising the design and development of your product with the help of a design control matrix can reduce the likelihood of mistakes that could compromise the product’s quality and performance.
Risk Management
When it comes to developing a new product, risk management is key. It’s all about identifying and mitigating potential risks that could derail the development process. This includes everything from technical challenges, manufacturing problems, supply chain disruptions, regulatory issues and even market risks!

How to develop a risk management plan?
-
- Identify the potential risks: The first step in creating a risk management plan is to identify the potential risks that might impact the project such as technical failures, delays, or budget overruns. This can be done through brainstorming sessions, stakeholder interviews, and other forms of research.
- Assess the likelihood and impact of each risk: Once you have identified the potential risks, it is important to assess the likelihood of each risk occurring and the impact it would have on the project. This can help you prioritise the risks and focus your efforts on the ones that need to be addressed first.
- Develop risk control measures: After you have identified and assessed the risks, you need to develop strategies to mitigate or manage them. This involves creating contingency plans, testing protocols or processes, quality control procedures or seeking additional resources.
- Monitor and review the risk management plan: It is important to continuously monitor and review the risk management plan to ensure that it remains effective and that any new risks are identified and addressed. This can be done through regular meetings, reviews of project progress, and other forms of monitoring and evaluation.
- Update the risk management plan: As the product development process progresses, it may be necessary to update the risk management plan to reflect any changes or new information.
- Communicate the risk management plan: It is important to communicate the risk management plan to all relevant parties, including team members, stakeholders, and regulatory bodies, to ensure that everyone is aware of the risks and how they are being managed.
Design controls and risk management go hand in hand in the product development process. Whether you’re developing a medical device, a consumer product, or an industrial product, these two elements are essential components of a successful product development strategy as they help you ensure that your product is developed safely, effectively, and in compliance with all necessary requirements and standards.
By considering both design controls and risk management, you can bring a top-notch product to market with confidence. So, if you want to create a product that truly stands out, make sure to include these considerations in your product strategy!
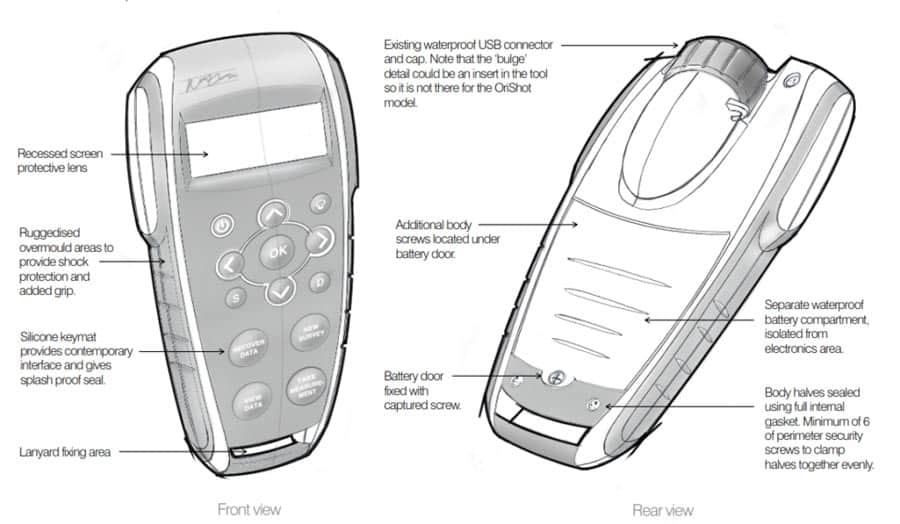
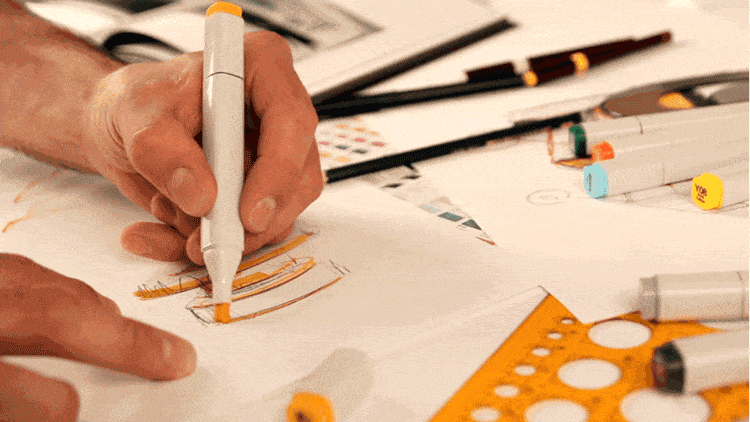
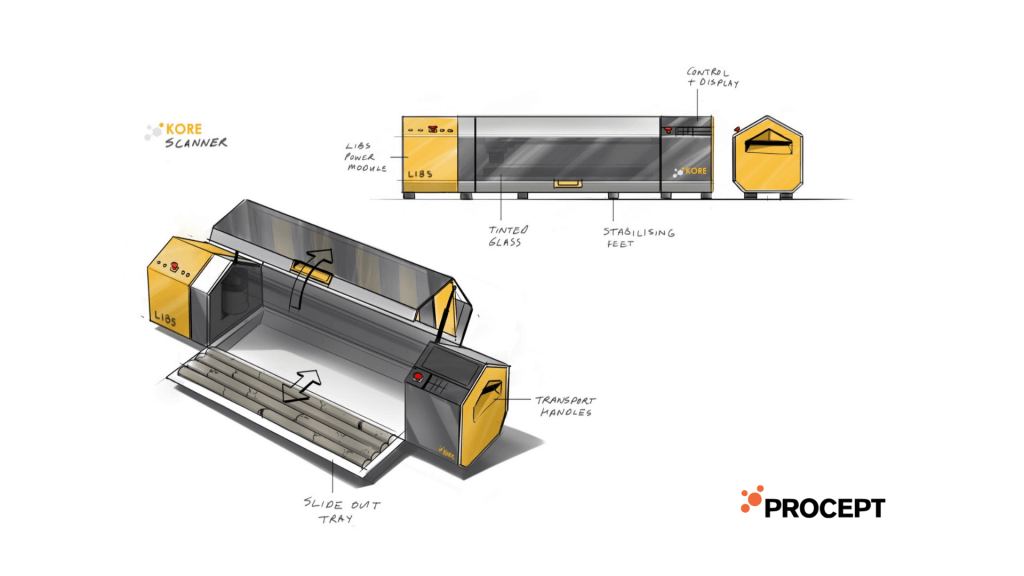
Prototype Creation
Now it’s time to move on to concept development and create a prototype! This is where you get to see your product idea come to life and bring it closer to reality! Creating a prototype allows you to communicate your product idea more effectively to others, such as investors or potential customers.
It provides a tangible way to demonstrate how your product works and how it will solve a specific problem or meet a particular need. All of the planning and preparation that you have done up to this point will come together as you bring your concept to fruition.

There are several different types of prototypes that can be used in the product development process, each with its own benefits and drawbacks.
What are the different types of product prototypes?
-
- Feasibility prototypes are used to test the technical feasibility of a product concept. They are typically low-fidelity and are used to verify that the product can be built using the available materials and technologies.
-
- Proof-of-concept prototypes are used to demonstrate the basic functionality of a product concept. They are typically low-fidelity and are used to validate the core concept of the product.
-
- Working prototypes are functional models of the final product. They are typically high-fidelity and are used to test the full range of features and functionality of the product.
-
- Visual prototypes are used to demonstrate the appearance and design of a product. They are typically used to test the design aesthetics and user experience of the product.
-
- A Minimum Viable Product (MVP) is a prototype that represents the minimum set of features and functionality that is needed to test the product concept with a target group of users. MVPs are used to gather feedback and validate the product concept before investing in full development.
How to create a product prototype?
-
- Define the purpose and goals of the prototype: Before starting the prototyping process, it’s important to define the purpose and goals of the prototype. This will help to guide the design and development of the prototype and ensure that it meets the needs of the project.
- Sketch out the design: Start by sketching out the basic design of the prototype. This can be done on paper or using design software. The goal at this stage is to create a rough idea of the layout and functionality of the prototype.
- Create a low-fidelity prototype: Using materials like cardboard, foam board, or wireframe software, create a low-fidelity prototype that represents the basic structure and layout of the final product. This prototype is used to test the basic concept and gather feedback.
- Iterate on the design: Based on the feedback gathered from the low-fidelity prototype, iterate on the design to refine and improve the concept.
- Create a high-fidelity prototype: Using materials that more closely represent the final product, create a high-fidelity prototype that represents the final design of the product. This prototype is used to test the full range of features and functionality of the product.
| 💡 | Pro-tip: Keep in mind that, the concept (low-fidelity) and proof of concept (high-fidelity) prototypes are not typically final products, but rather representations of the product idea, the goal is to prove the product can be created and test its feasibility. |
After creating a high-fidelity prototype, you still need to test and refine it based on user feedback until it meets the desired goals and objectives before creating the final product, which we will talk more about later!
Stage 3: Pilot Systems Testing
Welcome to the pilot testing stage! This is where things start to get really exciting, as you begin to see your product take shape and start to interact with real-life users. But before you can jump into pilot testing, there are a few key steps you’ll need to take.
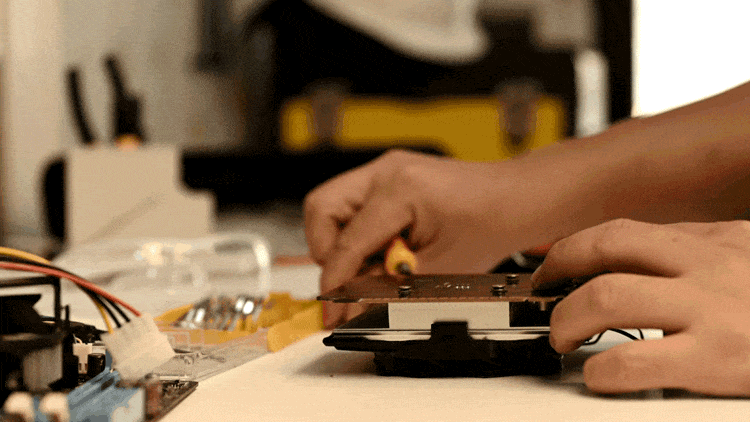
Depending on your product, this could involve a variety of tasks, such as designing and building production-ready prototypes, developing algorithms and writing code. This stage is all about turning your product concept into a functional prototype that can be tested and refined.
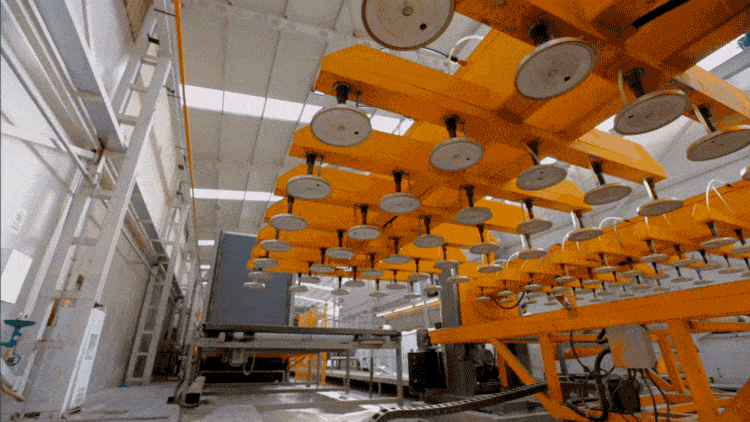
Hardware and Software Engineering
This can be considered the information technology stage that encompasses both hardware and software engineering.
Hardware engineering involves the design and construction of physical components such as electronics, mechanical parts, and other components that make up your product.
Software engineering, on the other hand, involves the development of computer programs and systems that control the functionality of your product.
To simplify the process, consider following these steps:
-
- Define your hardware and software requirements: Start by identifying what hardware and software components you need for your product. This includes input devices, output devices, and other hardware elements, as well as software programs, apps, and other digital components.
- Design your hardware and software components: Once you know what you need, start designing your hardware and software components, which involves creating prototypes, sketches, and other design documents to help you visualise your product.
- Develop your hardware and software components: With your designs in hand, start building out your hardware and software components. This involves sourcing materials, assembling components, and writing code.
- Test your hardware and software components: As you develop your product, be sure to test your hardware and software components to ensure that they are working as intended. This involves conducting functional tests, performance tests, and other types of testing.
- Integrate your hardware and software components: Finally, bring all of your hardware and software components together to create a complete product. This includes integrating your hardware and software components into a single device or system.
To effectively complete these tasks, it’s important to have a strong understanding of both hardware and software concepts, as well as the ability to work closely with teams of engineers and developers.
Industrial Design
This is where you’ll be working on the aesthetics of your product, including its shape, colour, and overall look and feel. Creating detailed drawings and models that capture the intended design of your product, as well as any necessary technical specifications is the main focus in this creative product development process.
Key considerations when designing your product include
-
- Functionality: The product must be functional and meet the needs of the user.
-
- Aesthetics: The product should be aesthetically pleasing and visually appealing.
-
- Ergonomics: The product should be comfortable and easy to use.
-
- Safety: The product should be safe to use and should meet relevant safety regulations.
-
- Sustainability: The product should be designed with sustainability in mind, considering the materials used and the impact it will have on the environment.
-
- Manufacturability: The product should be easy to manufacture and assemble.
-
- Cost: The product should be cost-effective to produce and sell.
Remember, a well-designed product is more likely to be successful in the market because it will appeal to consumers and meet their needs!
Product and Design Reviews
Once you’ve got your hardware and software in place, it’s time to start developing your product commercially and getting feedback from customer trials. This could involve a variety of tests, such as user testing, functional testing, and performance testing.

Feedback gathered from user tests can be invaluable in helping you understand how users are interacting with your product and identify any areas for improvement.
How to conduct product and design reviews?
-
- Define the purpose of the review: Determine the goals of the review which include factors such as functionality, usability, performance, and aesthetics — and note relevant learning outcomes. This can help to guide the review process and ensure that you focus on the most important aspects of the product.
- Identify the target users: Invite the right people to participate in the review. This includes members of the product development team, subject matter experts, customers, and other stakeholders.
- Set an appropriate time: Schedule the review at an appropriate time in the product development process. This may be at the end of a development phase or when a specific milestone has been reached.
- Gather and analyse data: Collect data on the product through customer reviews, expert reviews, user testing, or beta testing. Review the data you have collected and look for patterns or trends. Identify any issues or problems with the product and consider how they can be addressed.
- Identify opportunities for improvement: Based on the data you have collected, identify areas where the product can be improved or enhanced. Consider the needs and preferences of the target audience and how these can be met.
- Share the results: Share the results of the review with the appropriate stakeholders, such as the product development team or management. Use the findings to inform future product development and to make necessary changes to the current product.
- Follow up: After implementing any changes based on the review, follow up to ensure that the product is meeting the needs of the target audience and that any identified issues have been addressed.
By reviewing your product or design at regular intervals, you can catch problems early on and address them before they become more difficult and costly to fix. While it may take some time and resources, the benefits of conducting these reviews far outweigh any potential drawbacks. Investing in a strong review process can help to improve the quality of your product, gain stakeholder support, and increase your chances of success!
Stage 4: Refine and Release
You’ve done the hard work — you’ve dreamed up a killer product, developed it, and even put it through the wringer with testing. Now it’s time to let it shine! During the refine and release stage, it’s all about putting the finishing touches on your masterpiece and getting it out into the world. But before you can start reaping the rewards of your hard work and planning, there are a few key steps you’ll need to take to ensure your product is ready for prime time.

Product Refinement
In the product refinement phase, you take all the feedback you’ve gathered from user testing, design reviews, and other sources, and use it to make any necessary adjustments to the product which could involve revising the design, adding new features, or making other changes to improve the user experience.
How to refine a product?
-
- Analyse data: Use data from market research, customer feedback, and sales metrics to identify trends and patterns that can help you refine your product.
-
- Identify problems: Look for areas of your product that are not meeting customer needs or that are causing issues in terms of functionality or quality.
-
- Develop solutions: Based on the problems you have identified, come up with potential solutions or modifications to your product.
-
- Test and iterate: Test your solutions through prototypes or focus groups to see how they work in practice. Make adjustments as needed until you are satisfied with the results.
-
- Implement changes: Once you have identified and tested effective solutions, implement them in your final product.
By following these steps, you can refine your product systematically and effectively, ensuring that you are meeting the needs of your customers and creating a high-quality product!
Regulatory Plan and Compliance Testing
A regulatory plan and compliance test take things to the next level. It’s all about making sure that your product is not only safe and effective, but also compliant with all the rules and regulations that govern its intended use including safety, labelling, and environmental impact.
To create a regulatory plan and conduct a compliance test, you’ll need to do some research and understand what regulations apply to your product. This might include industry-specific standards, as well as broader regulations related to things like safety and environmental factors.
How to develop a regulatory plan for compliance testing?
-
- Identify the relevant regulatory agencies and requirements: The first step is to determine which regulatory agencies will be involved in the product development process and what requirements need to be met.
- Determine the regulatory classification: The next step is to determine the regulatory classification of the product, which will determine the level of regulatory oversight that is required.
- Identify any applicable standards: There may be specific standards or guidelines that the product must meet in order to be compliant. These may include industry-specific standards or international standards such as ISO 13485 for medical devices.
- Develop a compliance testing plan: A testing plan should be developed to ensure that the product meets all necessary requirements and standards. This may involve conducting laboratory testing or clinical trials.
- Document the results of the compliance testing: As the compliance testing is conducted, it is important to document the results clearly and comprehensively. This will typically involve creating detailed test reports that outline any issues that were identified and the steps that were taken to address them.
- Remediate any non-compliant areas: If the compliance testing reveals that the product or system is not compliant with the identified requirements, it will be critical to address the non-compliant areas. This may involve making changes to the product or system or implementing additional controls or processes to ensure compliance.
- Retest and validate: Once any necessary remediation has been completed, it will be crucial to retest the product or system to ensure that it is now compliant with the identified requirements. This may involve conducting additional testing or simply verifying that the changes made to the product or system have been effective.
- Prepare for regulatory submissions: Depending on the regulatory agency and the product classification, it may be required to submit certain documentation or information to obtain regulatory approval. This may include submitting a premarket notification or application for approval.
- Review and update the regulatory plan: As the product development process progresses, it may be vital to review and update the regulatory plan to ensure that it is still relevant and accurate. This may involve updating the testing plan or making changes to the product to meet new regulatory requirements.
| 💡 | Pro-tip: Involve regulatory experts in the development of your regulatory plan to ensure compliance with all relevant regulations and avoid delays. |
Incorporating Quality Assurance (QA) into the regulatory planning process helps you ensure that your product meets all necessary regulatory requirements and is approved for release. By identifying relevant regulatory requirements, conducting compliance testing, documenting results, addressing any issues, and retesting as needed, you can be confident that your product meets the fundamental standards and is ready for release.
Product Registration
Next up is registering your product to relevant authorities, to ensure that your product meets certain standards and is legally permitted to be sold within a given geographic area. This process requires many manufacturers or vendors to submit relevant information, such as the composition, intended usage, and testing and clinical trial data of the product, to the respective authorities.
Upon completion of the registration process and compliance with regulations, the product is added to a public registry and is thereby authorised for distribution within the Australian market.
How to register your product?
-
- Prepare the necessary documentation: Depending on the product and the regulatory requirements of your target market, it may be necessary to prepare a variety of documentation to support the product registration application. This may include product labelling, technical documentation, safety data sheets, and other materials.
- Submit the product registration application: Once all of the necessary documentation has been prepared, the next step is to submit the product registration application to the relevant regulatory agency. This may involve submitting the application electronically or by mail, along with the required fees.
- Review and evaluation: Once the product registration application has been received, the regulatory agency will review the application and evaluate the product to ensure that it meets all of the necessary requirements. This may involve requesting additional information or documentation or conducting testing or other evaluations.
- Approval or denial: If the regulatory agency determines that the product meets all of the necessary requirements, it will issue a product registration approval. If the product does not meet the requirements, the regulatory agency will deny the application and provide feedback on the areas that need to be addressed in order to obtain approval.
- Maintenance of product registration: Once a product has been approved for sale, it is important to maintain the product registration by keeping the regulatory agency informed of any changes to the product or the manufacturing process, and by renewing the registration as necessary.
| 💡 | Pro-tip: Product registration is typically required for products that have the potential to impact public health or safety, such as pharmaceuticals, medical devices, and certain types of consumer products. |
In addition to being a regulatory requirement, product registration can also help to establish credibility and build trust with customers. Customers may be more likely to purchase a product that has been approved for sale by a regulatory agency, as it provides an additional level of assurance that the product is safe and effective.
Product Certification
Product certification is a way to give your product some extra shine and make it stand out in a crowded marketplace. Not only can it help you to comply with regulations and keep your customers confident in your product, but it can also give you a competitive edge.
How to certify your product?
-
- Identify relevant certifications: Determine which certifications are relevant for your product and market, and research the requirements for each certification.
- Understand the costs and time required: Obtaining product certification can be a time-consuming and costly process. It is important to understand the costs and time required to obtain each certification and to factor this into your business plan.
- Ensure ongoing compliance: Once a product has been certified, it is important to ensure that it continues to meet the requirements for the certification. This may involve regular testing or audits to ensure compliance.
- Communicate certifications to customers: Make sure to communicate any certifications to customers, as this can help to build trust and confidence in the product. This can be done through marketing materials, product labels, or other channels.
Examples of product certifications in Australia
-
- Australian Made and Owned Certification promotes products made in Australia, using mostly Australian materials, and owned by Australians.
-
- Australian Organic Certification guarantees that the organic products grown and produced in Australia comply with the National Standard for Organic and Biodynamic Produce.
-
- Environmental Management Systems Certification (ISO 14001) confirms that your business has an environmental management system in place, committed to reducing its environmental impact.
-
- Food Safety Certification, which certifies that the food product has been prepared, packed and handled in a way that is hygienic and safe to consume.
-
- Electrical safety certification, which ensures that electrical products meet safety standards and can be safely used in the home.
| 💡 | Pro-tip: Please note that this is a partial list to give you an idea of some standard certifications available in Australia. Other specific certifications might apply depending on the product type and industry. |
Going through the process of obtaining product certification can help to improve the overall quality and reliability of your product. It’s like a seal of approval that shows everyone that your product is top-notch. So don’t be afraid to go for it — your product (and your customers) will thank you!
Stage 5: Manufacturing
You’ve made it through the product launch stage, and your product is finally ready for manufacturing! All of those shiny new ideas and innovative designs would just be a bunch of pipe dreams and scribbles on a napkin without manufacturing.
Design Transfer
First and foremost, you’ll need to transfer the design of your product from the development team to the manufacturing team. This is an important step, as it helps to ensure that the product is manufactured according to the original design specifications and that any changes or improvements made during development are incorporated into the final product.

Steps in transferring your product design
-
- Document the design: Make sure that the design is thoroughly documented, including all necessary specifications, dimensions, materials, and tolerances.
- Create detailed drawings: Produce detailed technical drawings of the design, including assembly and component drawings.
- Prepare a bill of materials: Make a list of all the materials and components needed to manufacture the product.
- Prepare process flows: Create process flows and work instructions to guide the manufacturing team through the production process.
- Provide prototyping support: Provide support to the manufacturing team as needed to create prototypes and test samples.
- Transfer knowledge: Transfer knowledge and expertise to the manufacturing team through training and knowledge-sharing sessions.
- Review and sign-off: Review the design transfer with the manufacturing team to ensure that all necessary information has been provided and that the team has a clear understanding of the design and production process.
- Monitor progress: Monitor the progress of the manufacturing team and provide support as needed to ensure that the product is being produced according to the design specifications.
- Make adjustments: Make any necessary adjustments to the design or production process as needed, based on feedback from the manufacturing team.
- Review and improve: Regularly review and improve the design transfer process to ensure that it is efficient and effective.
Distribution Network Setup
Next, you’ll need to set up your distribution network. This involves establishing relationships with suppliers, distributors, and other partners who will help get your product to market. It’s important to choose partners who are reliable, efficient, and aligned with your business goals.
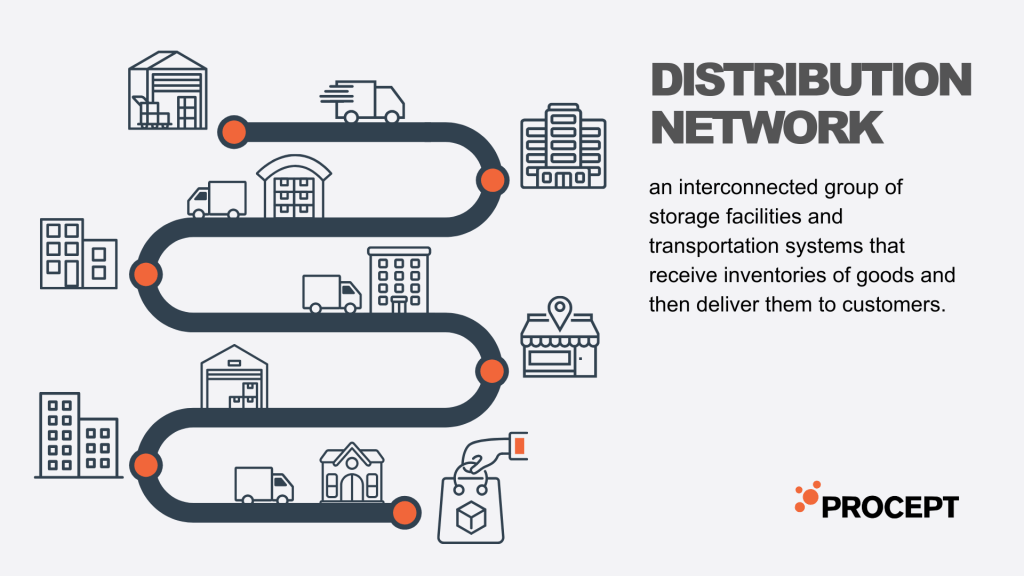
How to set up a distribution network
-
- Identify potential distribution channels: Once you have a defined target market, the next step is to identify the distribution channels that are most appropriate for your product. This may include direct sales, retail stores, e-commerce platforms, or a combination of these channels. Factors to consider may include the size and reach of the channel, the level of control you have over the distribution process, and the costs involved.
-
- Evaluate potential distribution partners: Choosing the right distribution partners is critical to the success of your distribution network. It is essential to evaluate potential partners carefully, considering factors such as their reputation, track record, and capabilities.
-
- Negotiate distribution agreements: These agreements will outline the terms and conditions of the distribution relationship, including issues such as pricing, marketing support, and returns.
-
- Set up logistics and fulfilment: This may involve setting up warehousing and transportation arrangements, as well as establishing processes for managing inventory and fulfilling orders.
-
- Monitor and optimise the distribution network: Once the distribution network is set up, it is important to monitor and optimise its performance on an ongoing basis. This may involve analysing sales data, identifying bottlenecks or inefficiencies, and making adjustments as needed to improve the efficiency and effectiveness of the distribution network.
| 💡 | Pro-tip: Choose a distribution strategy that is scalable, as this will allow you to easily expand your distribution network as your business grows. |
An effective distribution channel plays a critical role in getting your product to market and making it available to customers. A well-designed distribution channel can help to ensure that your product is available to customers when and where they want it, and can help to minimise costs and increase efficiency.
Plus, it can also help to build credibility and establish trust with customers. Customers may be more likely to purchase a product if it is widely available and easy to obtain, as this provides an additional level of assurance that the product is legitimate and of good quality!
Marketing Materials
Examples of marketing materials to promote your product
-
- Product brochures or flyers: These materials provide an overview of the product’s features, benefits, and technical specifications, and are often used to generate interest in the product and encourage potential customers to learn more.
-
- Press releases: Press releases are used to inform the media and other stakeholders about the product launch and provide key information about the product.
-
- Sales collateral: Sales teams use sales collateral to promote the product to potential customers and may include product sheets, case studies, and demo videos.
-
- Product website: A product website is a key marketing tool that provides detailed information about the product, including its features, benefits, and technical specifications. It may also include customer testimonials, case studies, and other resources to help potential customers learn more about the product.
-
- Email marketing campaigns: Email marketing campaigns can be used to promote the product to potential customers and encourage them to learn more or purchase the product.
-
- Social media campaigns: Social media campaigns can be used to promote the product and engage with potential customers on platforms such as Facebook, Twitter, and Instagram.
-
- Paid advertising: Paid advertising, such as Google AdWords or Facebook Ads, can be used to target specific audiences and generate interest in the product.
It’s necessary to create materials that accurately reflect the features and benefits of your product and that appeal to your target market. If things don’t go as planned, you can tweak your go-to-market strategy.
To help you develop your go-to-market plan, you can use free product marketing kits. The tool will provide you with a framework to follow. In addition, you can track your results to see how successful your go-to-market strategy is.
Stage 6: Support and Maintenance
Now you’ve successfully launched your product and it’s out in the wild, being used and enjoyed by your customers. But the journey doesn’t end there. To ensure that your product continues to meet the needs of your users and performs at its best, you’ll need to implement a support and maintenance process.
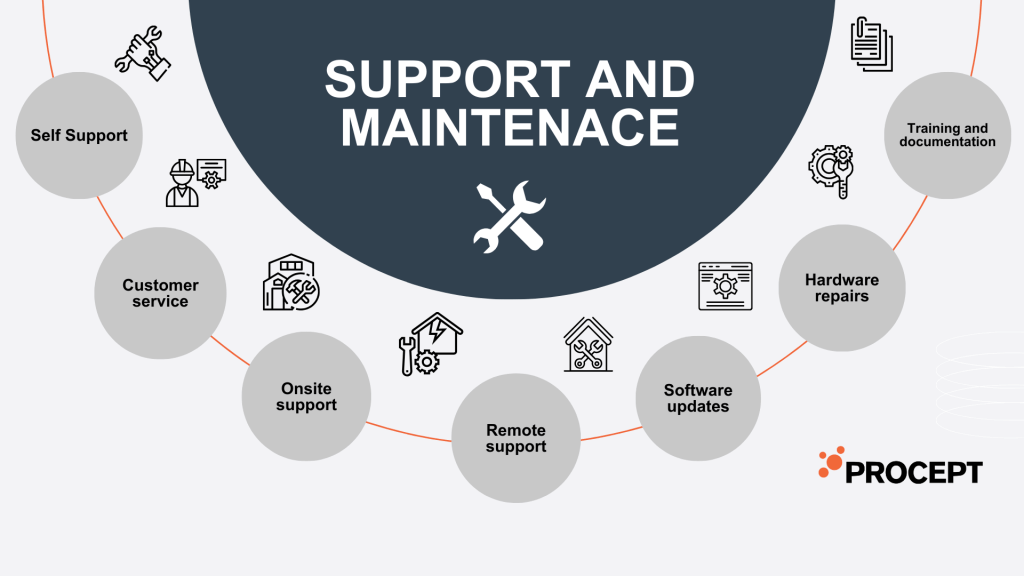
Different types of support and maintenance you need to provide to your users
-
- Self-support: One option is to provide customers with resources and tools that allow them to troubleshoot and resolve issues on their own. This may include online help centres, user manuals, and other self-service resources.
-
- Customer service: Another option is to provide customers with access to a dedicated customer service team or representative who can assist with troubleshooting and problem resolution. This may involve providing phone, email, or chat support.
-
- Onsite support: In some cases, it may be necessary to provide onsite support in order to resolve complex issues or provide training and assistance. This may involve sending technicians or other experts to the customer’s location.
-
- Remote support: Another option is to provide remote support, which allows technicians to access and troubleshoot the product remotely using remote access tools.
-
- Software updates: Regular software updates can be an important part of the support and maintenance process, as they can help to fix bugs, improve performance, and add new features.
-
- Hardware repairs: If the product includes hardware components, it may be necessary to provide repair or replacement services as part of the support and maintenance plan.
-
- Training and documentation: Providing training and documentation can help customers to effectively use and maintain the product, and may be a fundamental part of the support and maintenance process.
| 💡 | Pro-tip: The main purpose of a support and maintenance plan is to keep a product working at optimal efficiency. A support plan should address a variety of issues, including ongoing and future problems. |
Wrapping Up
In summary, the product development process is a multi-faceted and complex endeavour that involves a variety of stages and activities. From identifying a new product idea and conducting market research to prototyping and testing, to refining and releasing the product, each stage of the process requires careful planning and execution to ensure the success of the final product.
By following a structured and well-defined process, you can increase your chances of creating a product that dominates the market, and ultimately drive business growth and success.
If you’re feeling overwhelmed with the entire process, contact us for a free consultation, and let’s discuss your idea!

Hi, we’re the award-winning engineering team at Procept.
We live and breath product development. Since 2006, our vision has been to make a positive difference through the application of the latest technologies to solve real-world problems and improve people’s lives.
Learn more about our product development services, engineering services, or joining our engineering team. To work with us on your next product development project, contact our team.
Let’s innovate!